Saturday STEAM Challenge – Tornado in a Jar

Tornado in a Jar

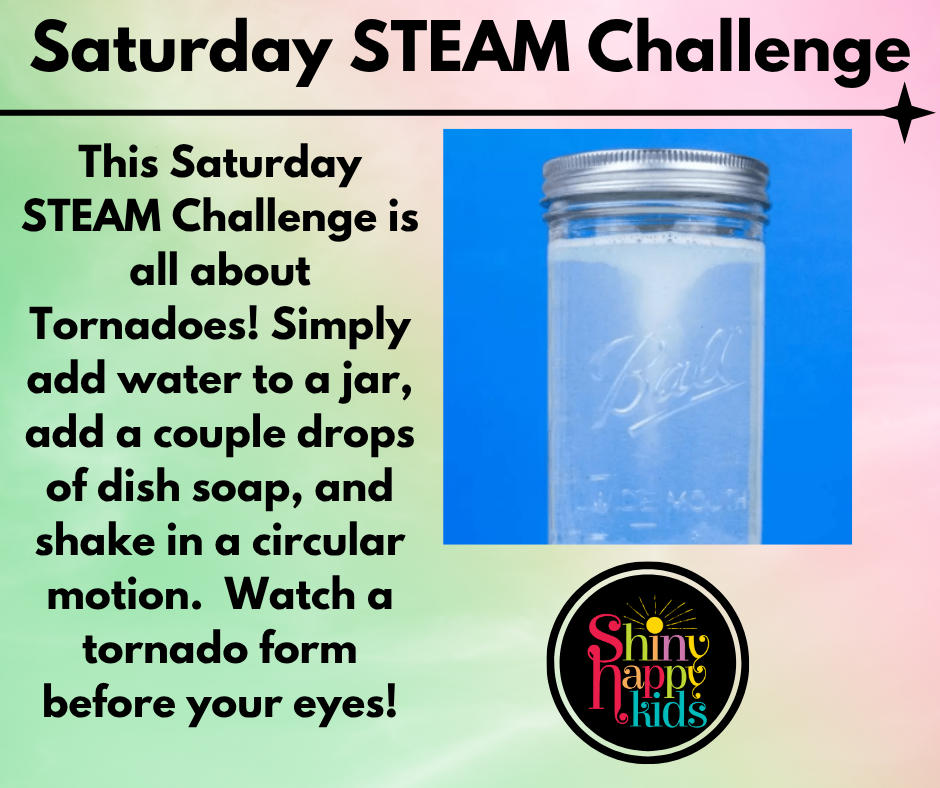
This Saturday STEAM Challenge is all about tornadoes! With just a few simple materials, kids can create their very own swirling storm in a jar. Fill a jar with water, add a few drops of dish soap, and (optional) a little glitter or food coloring for extra effect. Secure the lid tightly, then swirl the jar in a circular motion and watch as a spinning tornado forms right before your eyes!

Materials:
-Clear jar or plastic bottle with lid
-Water
-Dish soap
-Optional : Food coloring or glitter

Instructions:

  1. Fill your jar or bottle up with water
  2. Add a couple of drops of dish soap
  3. Optional : Add a sprinkle of glitter or food coloring
  4. Shake your jar in a circular motion to create your tornado!

As the water spins, you’ll see a vortex form in the center—just like a real tornado. This is a fun and simple way to explore how motion and force create movement in liquids.

Extra STEM Challenges

  1. Speed Test: Spin the jar slowly and then quickly—how does the tornado change?
  2. Observation Challenge: What shape does the tornado make? How long does it last?
  3. Add-On Experiment: Try adding glitter or small beads to better see the movement inside the vortex.
  4. Comparison Test: Does a larger jar or smaller jar make a different tornado?
  5. Direction Challenge: Spin clockwise and then counterclockwise—what do you notice?
  6. Real-World Connection: Talk about where tornadoes happen and how they form in nature.

This activity helps kids explore motion, force, and simple weather science in a fun and hands-on way.

Be sure to subscribe to our Website and follow our Instagram

xo Shiny Happy Kids

Saturday STEAM Challenge – Watercolor Rain Cloud

Watercolor Rain Cloud

Explore color blending, painting, and gravity in this fun STEAM Challenge. You’ll need minimal materials to create your very own Watercolor Rain Cloud! Simply add watercolors doused in water to the top of the page, tilt your paper and watch the watercolors rain! Add cotton balls and Voila, your very own rain cloud!

Materials:
-Watercolor paper or white cardstock
-Watercolors
-Paintbrush
-Tape/binder clip
-Easel, large piece of cardboard, or clipboard
-Glue
-Cotton balls

Instructions:

  1. Take a piece of watercolor paper or white cardstock.
  2. Place the paper on an easel, clipboard, or piece of large cardboard. You can use a piece of tape or binder clip. Keep it flat for now.
  3. Mix water and liquid watercolors together to make the paint. Or use water colors but make it extra watery.
  4. With the paper flat, start at the top of the paper and add a decent amount of watercolor paint. Use blues and purples.
  5. Now tilt the paper so the paint will run down towards the bottom of the page.
  6. Add more color if need be.
  7. Let the paint dry.
  8. Add cotton balls to the top of the paper to create clouds!

Extra STEAM Challenges

  1. Color Mixing Challenge: Try using primary colors and observe what new colors form as they “rain” down.
  2. Gravity Test: Tilt your paper at different angles—what happens when you tilt it more or less?
  3. Pattern Play: Can you control the paint to create straight lines, zig-zags, or waves?
  4. Weather Twist: Add lightning bolts or a rainbow to your scene using markers or crayons.
  5. Layering Challenge: Let one layer dry, then add more “rain” on top to see how the colors change.

Observation Skills: Ask kids to describe how the paint moves and what changes they notice.

This hands-on activity encourages creativity while helping kids explore gravity, motion, and color blending in a fun and meaningful way.

Be sure to subscribe to our Website and follow our Instagram

xo Shiny Happy Kids

Saturday STEAM Challenge – Lady Bug Math

Lady Bug Math

This fun STEAM challenge blends art and math in a hands-on, creative way! Using pictures of ladybugs, children can use finger paint to add spots while practicing counting skills. Start by adding one spot to the first ladybug, then two spots to the next, and continue building number recognition as you go.

As kids paint, they’ll not only explore numbers but also strengthen fine motor skills and creativity. It’s a simple and engaging way to make math come to life through art!

Materials:
-Print out of blank lady bugs OR Create/paint your own.
-Black paint
-Use fingers or q-tips or stamping sponge

Instructions:

  1. Take your lady bug print out and place in front of you
  2. Dab your finger/stamp in the paint and add the number of dots that match the number.
  3. Count as you go for each.
  4. Try the different challenges below!

Extra STEAM Challenges

  1. Counting Challenge: Count each set of spots out loud as you add them.
  2. Number Match: Write numbers next to each ladybug and match the correct number of spots.
  3. Addition Fun: Combine two ladybugs—how many spots are there in total?
  4. Pattern Play: Create patterns with the spots (big/small, colors, or placement).
  5. Color Mix Challenge: Use different paint colors and mix them to create new spot colors.
  6. Creative Twist: Design your own unique ladybug with as many spots as you want!

This activity encourages kids to explore early math concepts, patterns, and creativity all in one playful experience.

Be sure to subscribe to our Website and follow our Instagram

xo Shiny Happy Kids

Saturday STEAM Challenge – Paper Plate Top

Paper Plate Top

Making a homemade spinning top is easier than you might think! In this fun STEAM challenge, kids will explore motion and design while testing which coin works best to create the longest spin.

Materials:
-Paper Plates
-Variety of Coins (Penny, Nickel, Dime, Quarter, Half Dollar, Dollar)
-Magic Markers, paint, or crayons
-Scissors

Instructions:

  1. Take your paper plate and decorate it! Use markers to add all kinds of colors or designs. Try spirals, polka dots, stripes or waves.
  2. Create a slit in the middle of the plate. Make sure it is no bigger than a dime. This will be our first coin to test.
  3. Slip the dime in the slit in the middle of the plate.
  4. Spin your top!
  5. Repeat steps with penny, nickel, quarter, and half dollar. Coins can be placed in the spinner one at a time OR they can each go in a spinner of their own.

As the top spins, watch closely to see how the colors blend and change. You might notice cool patterns or optical illusions forming as the top spins faster!

Now it’s time to experiment. Try different coins and see which one helps the top spin the longest. Does the size or weight of the coin make a difference?

Extra STEAM Challenges to try:

  1. Design Illusion Challenge: Draw stripes, spirals, or dots and watch how the patterns change while spinning.
  2. Color Mix Challenge: Use multiple colors and observe how they blend together when the top spins quickly.
  3. Balance Challenge: What happens if the coin is slightly off center?
  4. Engineering Upgrade: Try adding small paper pieces to change the weight distribution and see what happens.

This simple activity helps kids explore physics concepts like motion, balance, and rotation while encouraging creativity and experimentation.

How did it go? Let us know below!

Be sure to subscribe to our Website and follow our Instagram

xo Shiny Happy Kids

Saturday STEM Challenge – Walking Water

This Walking Water STEAM experiment is so much fun and so easy to do! The whole family will love it!

Kids will be amazed by this Walking Rainbow Water experiment! Using simple household materials like jars, paper towels, water, and food coloring, you can watch colors slowly travel from one jar to another to create a beautiful rainbow. This fun STEM activity shows how water can “walk” through paper towels while also demonstrating the magic of color mixing.

Materials:
-Small plastic cups, glasses, or jars
-Paper towels
-Food Coloring in primary colors
-Water

Tip: Use half sheet paper towels. Depending on how absorbent your paper towels are, depends on how quickly the colored water moves.

Instructions:

  1. Place 7 cups in a row or a circle
  2. Pour water in the 1st, 3rd, 5th, and 7th cup. Fill about 3/4 up.
  3. Add 5 drops of food coloring to the following cups.
    -red to the 1st cup
    -yellow to the 3rd cup
    -blue to the 5th cup
  4. Take you half sheet of paper towel fold it lengthwise until its a small strip.
  5. Trim the paper towel strip so it isn’t too long
  6. Place these paper towel strips into connecting jars.
  7. Watch the water “walk”

Extra STEM Challenges to try:

  1. Prediction Challenge: Ask kids which colors will appear when the water mixes before the experiment begins.
  2. Speed Test: Try using different types or thicknesses of paper towels. Which one moves the water the fastest?3.
  3. Design Challenge: Try arranging the jars in a circle to make a full rainbow loop.
  4. Experiment Upgrade: Test what happens if you use warm water versus cold water.
  5. Science Journal: Have kids draw or write what they notice as the colors travel.

This hands-on activity helps kids explore capillary action, color mixing, and observation skills while creating a colorful rainbow experiment.

How did it go? Let us know below!

Be sure to subscribe to our Website and follow our Instagram

xo Shiny Happy Kids

Saturday STEAM Challenge – Pot of Gold

Are you ready to float some gold? In this fun STEAM challenge, kids will design and build their own “pot of gold” using simple household materials. Try using foil, coffee filters, cardboard, or other craft supplies to create a container that can hold coins. Don’t forget to add a handle so your pot is easy to carry!

Materials:
-Various supplies: coffee filters, foil, cardboard, etc.
-A collection of pennies or all the same coin
-Construction paper or cardstock
-Glue or tape
-Bucket
-Water

Instructions:

  1. Supply your learner with various supplies.
  2. Have them construct a small pot that is meant to float.
  3. Add a handle.
  4. Fill bucket up with water.
  5. Add your pot to the water to float.
  6. Start adding pennies one by one until it sinks.

How many pennies or Gold could your pot carry before sinking?

This activity is a great way for kids to explore engineering, design, and buoyancy while having fun experimenting with different materials.

Try these Extra Challenges:

  1. Material Test: Which material works best for floating—foil, paper, or cardboard?
  2. Shape Challenge: Try different shapes (wide, tall, or bowl-shaped) and see which holds the most coins.
  3. Handle Strength Test: Does your handle stay strong as the pot gets heavier?
  4. Prediction Game: Before adding coins, guess how many your pot will hold. Were you right?
  5. Team Build: Work with a partner to design a pot that can hold even more coins.
  6. Rainbow Bonus: Decorate your pot with rainbow colors for a festive St. Patrick’s Day theme.

Encourage your learner to observe what happens as they add coins and talk about why some designs float longer than others.

We would love to hear how this maze challenge went at home! Let us know in the comments below.

Be sure to subscribe to our Website and follow our Instagram

xo Shiny Happy Kids

Saturday STEAM Challenge – Paper Plate Pinball

Start with one paper plate and access to various craft supplies. You can use construction paper, cardboard, pipe cleaners, and even straws. Create a fun obstacle course for a marble to run through! In the spirit of St. Patrick’s Day, try using a rainbow of colors!

Materials:
-Paper plate – Sturdy one with edges work best
-Marble
-Various craft supplies: construction paper, straws, wikki stix, pipe cleaners, cardboard
-Tape or glue
-Scissors

Instructions:

  1. Take your various craft supplies and create different arches or tunnels throughout your plate.
  2. Try adding ramps or even pockets.
  3. Add a point system to the various tunnels and arches.
  4. Play Paper Plate Pinball!

This hands-on activity encourages creativity, problem-solving, and engineering thinking while kids experiment with motion, design, and gravity.

Extra Pinball Challenges to Explore:

  1. Score Challenge: Keep track of points and see who can earn the highest score in three turns.
  2. Obstacle Upgrade: Add more ramps, zig-zag paths, or spinning pipe cleaner obstacles.
  3. Design Challenge: Use only three materials to build your course.
  4. Rainbow Builder: Try using all the colors of the rainbow somewhere on your obstacle course.

We would love to hear how this maze challenge went at home! Let us know in the comments below.

Be sure to subscribe to our Website and follow our Instagram.

xo Shiny Happy Kids

STEAM Challenge Friday – Heart Cup Tower

Heart Cup Tower

Build heart-shaped towers using red cups and sturdy cardboard as the base. Start by planning your design—will your heart be wide and short or tall and narrow? Carefully stack the cups to form the heart shape, making sure each layer is balanced and secure.

Materials:
-Red solo cups
-Cardboard cut into strips

Simply use the suggested materials to build your very own heart tower!

Bonus Challenges to Try:

  1. Tall Tower Challenge: How tall can you make your heart tower before it topples over?
  2. Stability Test: Gently tap the table—does your tower stay standing?
  3. Speed Challenge: Can you build your heart in under 2 minutes?
  4. Design Upgrade: Add decorations with markers, stickers, or paper hearts.
  5. Team Build: Work with a partner—one person stacks while the other checks balance.
  6. Math Moment: Count how many cups you used and compare designs with others.
  7. Creative Twist: Can you build two hearts stacked on top of each other?

Encourage your little engineer to test, adjust, and rebuild as they go. Talk about what worked, what didn’t, and how small changes can make a big difference in their design. Most importantly—have fun experimenting and creating!

How did it go? Let us know below!

Be sure to subscribe to our Website and follow our Instagram

xo Shiny Happy Kids

STEAM Challenge Friday – Heart Marble Maze

Heart Marble Maze

Who doesn’t love a marble maze? This heart-shaped version is a fun and engaging twist on a classic game.

Materials:
-liquid glue or hot glue
-yarn
-marble or small ball
-cardboard box or poster board

Instructions:

  1. Take a piece of cardboard or poster board and cut to desired size.
  2. Take your yarn and create a heart-maze or path and glue it to your base. If using hot glue, parent assistance may be needed.
  3. Once the glue is dry, add your marble or small ball to the entrance and carefully guide it through the maze!

By carefully tilting the board, it allows for the strengthening of hand-eye coordination and patience as they navigate each turn. For younger kids, tracing the maze with a finger or pencil is a great way to practice control and follow a path from start to finish.

Encourage them to slow down and notice how their movements affect the marble’s path.

Extra Maze Challenges to Try:

  1. Eyes-Closed Challenge: Trace the maze with a finger or pencil while keeping your eyes closed.
  2. Speed Run: Time how long it takes to complete the maze and try to beat your record.
  3. One-Hand Challenge: Can you guide the marble using only one hand?
  4. Reverse Route: Start at the finish and work your way back to the beginning.
  5. Design Twist: Add obstacles or change the maze path using tape, string, or cardboard.
  6. Team Play: One person gives directions while the other moves the marble.

These challenges encourage focus, problem-solving, and perseverance—while keeping the activity fun and hands-on for kids of all ages.

We would love to hear how this maze challenge went at home! Let us know in the comments below.

Be sure to subscribe to our Website and follow our Instagram

xo Shiny Happy Kids

STEAM Challenge Friday – Bubble Art

Bubble Art

Come get artsy with us today! Bubble art is a fun and colorful activity for kids of all ages!

Materials:
-Cardstock or Paper
-Water
-Dish soap
-Food Coloring
-Straw

Instructions:

  1. Add dish soap with water in a small cup
  2. Add food coloring (darker colors work best) May stain so be careful.
  3. Have your child blow bubbles with a straw until they overflow onto a sheet of paper.

When the bubbles pop, they leave a swirl of bright, unique colors—making a one-of-a-kind piece of art.

Extra Bubble Art Challenges for Kids:

  1. Color Mixing Challenge: Use two or more food coloring colors in one cup and watch as the bubbles mix to create new colors on the paper.
  2. Pattern Challenge: Try blowing bubbles in a specific order or direction to create repeating patterns or designs.
  3. Size Challenge: Experiment with different bubble sizes by blowing gently or more forcefully and see how the prints change.
  4. Timed Challenge: See how many colorful bubble bursts your child can make in 1–2 minutes.
  5. Team Challenge: Work with a friend or sibling to create a collaborative bubble masterpiece. Let the bubbles dry and add marker designs.

Bubble art is not only fun but also encourages creativity, experimentation, and a bit of scientific exploration as kids watch the bubbles form, rise, and pop.

What a fun project! We hope you had fun exploring with colorful bubbles. Send us a comment or pictures so we can see your beautiful work!

Be sure to subscribe to our Website and follow our Instagram

xo Shiny Happy Kids